Sunday, 30 October 2016

Emelia's Flowers

My tiled floor painted and ready to go. 
After Mulberry House I was totally hooked on Quarter Scale. For my next project I decided to do a shop. I was inspired by a flower tutorial I found on Pinterest and a picture that was posted on The MiniatureBeehive -Bea Broadwood from Petite Propertie's yahoo group-. I duly purchased The Corner Shop Kit and Book from Petite Properties (this kit has sadly been retired now but there are still lots of shop kits available). On arrival of my kit, I read the instructions thinking it would be similar to Mulberry House and have cereal packet bricks and soon realised that the bricks were in fact clay 😱. This was the most scary prospect yet. I had flashbacks to pottery at school...I was not good at pottery. Everybody in my class made beautiful regal coil pots but mine looked like a plate of spaghetti.  Still, I had faith in Bea's expert tutoring so I took the plunge. The first job was the terracotta flooring. I rolled out my clay and scribed the tiles. Far from being stressful, it was very satisfying and quite cathartic. I was so pleased with the results. 


This was pre-touch up!
Next job was the mouldings inside and out. Bea's Kit and Book series give you step by step instructions and are really easy to follow. I didn't take long to do. I completed the shop front -this was mainly card- and the interior panelling, skirting and doors (more cereal box card). I decided to wallpaper the downstairs. I found some lovely card making paper in Hobbycraft with very small designs. It was perfect. After decorating the shell of the shop, I glued it all together and was ready for the brick clay work. 


 I want to share a few tips I've picked up with regards to using clay. I use a Perspex sheet with a sheet of greeseproof paper to roll my clay out on. The paper makes it easier to lift thin sheets. If the clay is too wet it will warp the MDF of the kit so leave the rolled out clay to dry for a few minutes before gluing it into place. I tried DAS air drying clay to begin with but didn't like the consistency. I like Scola clay which is a little drier and thicker, but experiment to see which one suits you. Take your time doing the scribing and be accurate with your measurements. Don't rush the drying process. I leave mine at room temperature for a couple of days before painting. The clay will shrink when it dries so slightly overlap the edges if you want a tighter fit. It can crack too, but these can be filled using a little clay mixed with water or just left to add to the effect.* 


After scribing the clay bricks and leaving it to dry it was time to paint them. I used a sandstone crafters acrylic and painted the clay all over with a brush. Then I mixed a brick coloured paint and sponge painted the bricks. The roof was made out of strips of card. To finish my exterior, I made a sign on Word, printed and laminated it (I named the shop after my beautiful daughter). Then I used a seed bead for the door knob, a gold sticker for the letterbox and  Emelia's was ready for business!!


Next time: Filling Emelia's with flowers.

*If you have anymore hints and tips please leave a comment.

Moving in to Mulberry

Having completed my first quarter scale (1/48th) house I was then faced with the problem  of where to get furniture. I discovered that whilst quarter scale was growing exponentially in popularity it is still not anywhere near as popular as the traditional 1/12th scale. So, my usual tactic of ambling around fairs and shops would have to be modified. I trawled eBay for Quarter Scale items but there wasn't that much available and then I discovered Esty

For those of you who, like me, have hitherto missed the hidden treasure that is Etsy, it's a site chock full of hand-made delights including a great selection of Quarter Scale furniture and accessories. I made my first furniture purchases of a clock, desk and chair from Morticia at La Petite Maison D'Amour.


Soon after I bought a gorgeous little bookcase from SDK MiniaturesMy beautiful Sally Reader maid needed more furniture to dust though so I looked for a Georgian settee and chairs. I disovered the lovely work of Jacquie at Simply Sweet n Small but she had nothing that fit the bill so I contacted her and asked if she accepted commissions. Most miniaturists are more than happy to accept commissions so if you can't find what you're looking for, just ask. Jacquie was more than happy to help me, and made me a beautiful settee and chairs at a very reasonable price.


Jacque's sofa and chair. I made the table from a Petite Properties Kit and a few beads.

My little house was filling up now, but I couldn't find any bedroom furniture so it was back to Petite Properties to look at their range of furniture kits. Another first for me having brought ready made furniture for my 1/12th house. When my kits arrived they were a little daunting, so tiny, but I needn't have worried, Bea's instructions were so clear and the kits went together easily and were so fun to paint and decorate. Here is the finished set (the accessories are made from tiny beads I picked up at hobby craft):


I was pretty chuffed with my first attempt at kit furniture so I got all brave and decided to make the bed from scratch. Petite Properties do two books on making 1/48th Scale furniture and I bought them both. 

I feel I need to interject at this point to discuss cost. Thus far I sound like I'm throwing money around like nobody's business...I'm not, I'm a teacher and have 6 children which means I'm pretty skint most of the time. There's two things you need to understand. First, I've had to play with the timeline to complete this blog. It actually took me nearly a year to build and fully furnish Mulberry House as I started other projects. Secondly, and more importantly, Quarter Scale is -well can be- dirt cheap!! Furniture kits are £1 - £3 on Petite Properties..The house kits are under £30 (some are under £20). Beads and bits cost very little and you only need snippets of cords and fabrics and tester pots of paint. So Quarter Scale is great for those hard up for more than space.

My first attempt at a four poster bed!
Back to the bed. I adapted a plan for a tester bed to make a four poster. I collected the supplies I needed such as foam board, beads and matchsticks, but I was finding it difficult to find fabrics. Bea uses tissue paper in her design but I wanted proper fabric. I found another gem in the shape of Little Trimmings. I found all the fabrics and trimming I needed on there and was ready to build my bed. Again it's not perfect, but I don't care, it's incredibly satisfying to build a mini from scratch and my little bed is more precious to me than anything I could have bought. Try it, if you haven't already, and you'll see.


So Mulberry House was furnished and I was over the moon with the results. I'm sure I will go back and add bits and pieces over time -I'm going to have a go at painting some minute paintings to liven the walls up a bit - but I was really chuffed with this, my first attempt at Quarter Scale. If you have any other suggestions for my Mulberry House...or any other comments...I'd love to hear from you so please leave a comment below.


Next time: I tackle clay bricks in Emelia's Flowers...

Sunday, 23 October 2016

Mulberry House

I've always had a fascination with all things small. When I was a child I desperately wanted a dolls house, and my Dad and I built one out of scrap wood we found at the tip (by we, I of course mean 'he', even though I was present I deserve little of the credit). When I had grown up and had disposable income I bought my first Dolls House Kit. It was a Dolls House Emporium 1/12th Scale Shop, but, after many years of happy miniature shopping, I had to admit to myself that there was little more to do to it and name it finished. 

Here in laid the rub....my long-suffering husband was reasonably tolerant of the massive dolls house in our bedroom, but we genuinely had no room for a second...was I to sell my creation? Or hide it away in the loft to make way for a new project? Luckily, while I was pondering this problem I discovered 1/48th or Quarter Scale. It was a scary prospect though. Obviously I had a little experience, having built, decorated and lit a 1\12th Scale house, but the smaller scale looked a lot more daunting and seemed to require a good deal more skill than I credited myself with. It was about then that I discovered Petite Properties run by the lovely Bea Broadwood. PP had a 'Kit and Book' series which seemed to me to be the perfect entre to the Quarter Scale world. So I took the plunge and bought a Mulberry House.

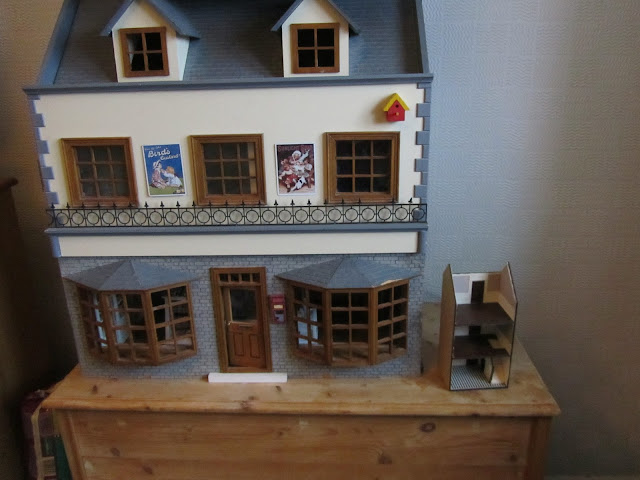
Here is my little Mulberry House next to it's big cousin! See the advantages of Quarter Scale!

My little package arrived with the basic MDF shell and a full-colour step-by-step instruction book. I did have to collect some basic craft tools and paints together but nothing you can't pick up at your local craft store. Bea's instructions are so easy to follow and the techniques very simple but so effective!  I have to admit I was hooked from the start. The shell went together like a dream. I was feeling like an expert miniaturist and was having daydreams of starting my own miniature business...and then the staircase brought me down to Earth with a bump!


My wonky staircase
It was tricky! Quarter scale is 1inch=4 feet...so a staircase is just 2 inches tall. It's really fiddly! My first attempt was rather humbling... it looked like it had been chewed by the dog. I tried again though. This time I was more precise with my score lines and took more time with the folding and this was the result. Now I know it's wonky, and more talented artisans will mock me, but I was so proud of my little staircase! It was the first bit of the build that made me feel like a genuine miniaturist in the making and still, to this day (because I've got a lot better) I love my little bent staircase. Once the staircase was done, the landing was a doddle.


Most of the cardboard for this house came from cereal packets
I'd like to take a moment to mention the very talented Sally Reader who made the dolls for my house. I discovered her at The Kensington Christmas Dolls House Festival. She makes the most gorgeous little wooden dolls and other toys in 1/12th, 1/24th and 1/48th Scale. She also accepts commissions (you'll see one in a future post).

A touch up here and there and my first Quarter Scale house was complete. It was so much fun I had ordered another two Kit and Books from Petite Properties before I'd finished. So I had a house..and two lovely dolls, but no furniture...


Next time:     Moving into Mulberry. Finding furnishings for my first creation.


Quarter Scale Creations

I would like to point out, just so you won't be disappointed later, that I am really not an expert miniaturist. In fact, that's the purpose of this blog really, to show what an average Joe like me can do with a little patience and the guidance from all the really excellent miniature artisans out there. The first few posts will be retrospective as I've now completed 4 houses and am getting more adventurous so bear with me, I have improved! There are links throughout to all those who are helping me along the way. I hope this blog will inspire others to take the plunge into Quarter Scale minis. You'll never look back!!